JS如何实现继承
JS如何实现继承
JS如何实现继承
是什么
继承(inheritance)是面向对象软件技术当中的一个概念。
如果一个类B“继承自”另一个类A,就把这个B称为“A的子类”,而把A称为“B的父类”也可以称“A是B的超类”
继承的优点
- 继承可以使得子类具有父类别的各种属性和方法,而不需要再次编写相同的代码
- 在子类别继承父类别的同时,可以重新定义某些属性,并重写某些方法,即覆盖父类别的原有属性和方法,使其获得与父类别不同的功能
形象示例
定义一个类(Class)叫汽车,汽车的属性包括颜色、轮胎、品牌、速度、排气量等
1
2
3
4
5
6
7
class Car{
  constructor(color,speed){
    this.color = color
    this.speed = speed
    // ...
  }
}
由汽车这个类可以派生出“轿车”和“货车”两个类,在汽车的基础属性上,为轿车添加一个后备厢、给货车添加一个大货箱
1
2
3
4
5
6
7
// 货车
class Truck extends Car{
  constructor(color,speed){
    super(color,speed)
    this.Container = true // 货箱
  }
}
这样轿车和货车就是不一样的,但是二者都属于汽车这个类,汽车、轿车继承了汽车的属性,而不需要再次在“轿车”中定义汽车已经有的属性
在“轿车”继承“汽车”的同时,也可以重新定义汽车的某些属性,并重写或覆盖某些属性和方法,使其获得与“汽车”这个父类不同的属性和方法
1
2
3
4
5
6
7
class Truck extends Car{
  constructor(color,speed){
    super(color,speed)
    this.color = "black" //覆盖
    this.Container = true // 货箱
  }
}
从这个例子中就能详细说明汽车、轿车以及卡车之间的继承关系
实现方式
下面给出JavaScripy常见的继承方式:
- 原型链继承
- 构造函数继承(借助 call)
- 组合继承
- 原型式继承
- 寄生式继承
- 寄生组合式继承
原型链继承 – 重写prototype
实现:直接重写构造函数的原型,将构造函数的原型赋值为想要继承的父级构造函数的示例对象。**
缺点:通过实例对象改变某个 key 值,所有实例相应的值都发生改变。
其中涉及的构造函数、原型和实例,三者之间存在着一定的关系,即每一个构造函数都有一个原型对象,原型对象又包含一个指向构造函数的指针,而实例则包含一个原型对象的指针
举个例子
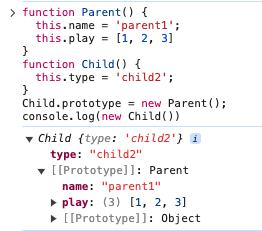
上面代码看似没问题,实际存在潜在问题
1
2
3
4
var s1 = new Child();
var s2 = new Child();
s1.play.push(4);
console.log(s1.play, s2.play); // [1,2,3,4] [1,2,3,4]
改变s1的play属性,会发现s2也跟着发生变化了,这是因为两个实例使用的是同一个原型对象,内存空间是共享的
构造函数继承 – Parent.call(this)
实现:在构造函数内将父级构造函数的 this 指向当前构造函数的 this。
缺点:只能继承父级实例上的属性和方法,不能继承父级原型对象 prototype 上的属性和方法。
1
2
3
4
5
6
7
8
9
10
11
12
13
14
15
16
17
18
19
20
function Parent(){
  this.name = 'parent1';
  this.play = [1, 2, 3];
}

Parent.prototype.getName = function () {
  return this.name;
}

function Child(){
  Parent.call(this);
  this.type = 'child'
}

let c1 = new Child();
let c2 = new Child();
c1.play.push(4)
console.log(c1, c2);  // 没问题
console.log(c1.getName());  // 会报错
console.log(c2.getName());  // 会报错
相比第一种原型链继承方式,父类的引用属性不会被共享,优化了第一种继承方式的弊端,但是只能继承父类的实例属性和方法,不能继承原型属性或者方法
组合继承 – 重写prototype + Parent.call(this)
实现:重写构造函数的原型为父级构造函数的实例对象,同时在构造函数内将父级构造函数的 this 指向当前的构造函数。
缺点:Parent 会被调用两次
1
2
3
4
5
6
7
8
9
10
11
12
13
14
15
16
17
18
19
20
21
22
23
24
25
function Parent () {
  this.name = 'parent';
  this.play = [1, 2, 3];
}

Parent.prototype.getName = function () {
  return this.name;
}

function Child() {
  // 第二次调用 Parent()
  Parent.call(this);
  this.type = 'child';
}

// 第一次调用 Parent()
Child.prototype = new Parent();

let c1 = new Child();
let c2 = new Child();
c1.play.push(4);

console.log(c1.play, c2.play);  // 不互相影响
console.log(c1.getName()); // 正常输出'parent3'
console.log(c2.getName()); // 正常输出'parent3'
这种方式看起来就没什么问题,方式一和方式二的问题都解决了,但是从上面代码我们也可以看到Parent3 执行了两次,造成了多构造一次的性能开销
原型式继承 – Object.create(Parent) 不添加额外的属性和方法
实现:利用 Object.create 方法实现普通对象的继承。
缺点:原型指向同一个对象,通过某个实例改变的原型上的 key 会导致所有实例读取到的值都是被修改后的 key 值(Object.create 方法实现的是浅拷贝,多个实例的引用类型属性指向相同的内存)。
同样举个例子
1
2
3
4
5
6
7
8
9
10
11
12
13
14
15
16
17
18
19
20
let parent = {
  name: "parent",
  friends: ["p1", "p2", "p3"],
  getName: function() {
    return this.name;
  }
};

let person1 = Object.create(parent);
person1.name = "tom";
person1.friends.push("jerry");

let person2 = Object.create(parent);
person2.friends.push("lucy");

console.log(person1.name); // tom
console.log(person1.name === person1.getName()); // true
console.log(person2.name); // parent
console.log(person1.friends); // ["p1", "p2", "p3","jerry","lucy"]
console.log(person2.friends); // ["p1", "p2", "p3","jerry","lucy"]
这种继承方式的缺点也很明显,因为Object.create方法实现的是浅拷贝,多个实例的引用类型属性指向相同的内存,存在篡改的可能
寄生式继承 – Object.create(Parent) 添加额外的属性和方法
跟原型式继承一样一样的,就是多加了一些额外的属性和方法。缺点也一样。
实现:利用 Object.create 方法实现普通对象的继承,并添加额外的属性和方法。
缺点:原型指向同一个对象,通过某个实例改变的原型上的 key 会导致所有实例读取到的值都是被修改后的 key 值(Object.create 方法实现的是浅拷贝,多个实例的引用类型属性指向相同的内存)。
1
2
3
4
5
6
7
8
9
10
11
12
13
14
15
16
17
18
19
20
21
22
23
24
25
26
27
28
29
let parent = {
  name: "parent",
  friends: ["p1", "p2", "p3"],
  getName: function() {
    return this.name;
  }
};

// 声明一个过渡对象
function clone(original) {
  let clone = Object.create(original);
  clone.getFriends = function() {
    return this.friends;
  };
  return clone;
}

let person1 = clone(parent);
person1.name = "tom";
person1.friends.push("jerry");

let person2 = clone(parent);
person2.friends.push("lucy");

console.log(person1.name); // tom
console.log(person1.name === person1.getName()); // true
console.log(person2.name); // parent
console.log(person1.friends); // ["p1", "p2", "p3","jerry","lucy"]
console.log(person2.friends); // ["p1", "p2", "p3","jerry","lucy"]
寄生组合式继承 – Object.create(Parent) + Parent.call(this)
实现:重写构造函数的原型为父级构造函数的实例对象,同时在构造函数内将父级构造函数的 this 指向当前的构造函数。
优点:Parent 只会调用1次,是较优的继承方案。
1
2
3
4
5
6
7
8
9
10
11
12
13
14
15
16
17
18
19
20
21
22
23
24
25
26
27
28
29
30
31
function clone(parent, child) {
  // 这里改用 Object.create 就可以减少组合继承中多进行一次构造的过程
  child.prototype = Object.create(parent.prototype);
  child.prototype.constructor = child;
}

function Parent() {
  this.name = 'parent';
  this.play = [1, 2, 3];
}
Parent.prototype.getName = function () {
  return this.name;
}
function Child() {
  Parent.call(this);
  this.friends = 'child';
}

clone(Parent, Child);

Child.prototype.getFriends = function () {
  return this.friends;
}

let c1 = new Child();
let c2 = new Child();
c1.play.push(4);
console.log(c1); // {friends: "child", name:"parent", play:[1,2,3,4], Prototype: Parent}
console.log(c2); // {friends: "child", name:"parent", play:[1,2,3], Prototype: Parent}
console.log(c1.getName()); // parent
console.log(c1.getFriends()); // child
ES6类的继承 – extends + super(props)
利用 ES6 的 class,结合 extends 关键字 和 super(props) 方法实现对父类属性和方法的继承。
1
2
3
4
5
6
7
8
9
10
11
12
13
14
15
16
17
18
19
20
class Person {
  constructor(name) {
    this.name = name
  }
  // 原型方法
  // 即 Person.prototype.getName = function() { }
  // 下面可以简写为 getName() {...}
  getName = function () {
    console.log('Person:', this.name)
  }
}
class Gamer extends Person {
  constructor(name, age) {
    // 子类中存在构造函数,则需要在使用“this”之前首先调用 super()。
    super(name)
    this.age = age
  }
}
const asuna = new Gamer('Asuna', 20)
asuna.getName() // 成功访问到父类的方法
利用babel工具进行转换,我们会发现extends实际采用的也是寄生组合继承方式,因此也证明了这种方式是较优的解决继承的方式
总结

通过Object.create 来划分不同的继承方式,最后的寄生式组合继承方式是通过组合继承改造之后的最优继承方式,而 extends 的语法糖和寄生组合继承的方式基本类似